I made this damper system to regulate heat and humidity in the grow room.
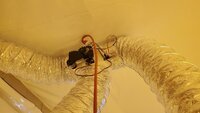
Basically two stepper motors controlling the dampers. One damper is store bought, made for recovering heat from dryer exhaust. I designed and printed gears to turn the damper with the motor. I designed and printed the other damper.

Modified damper. Controls exhaust rate.

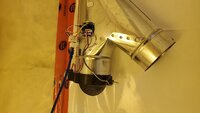
This one directs recirculating air through a humidifer. Not attached in spring summer.

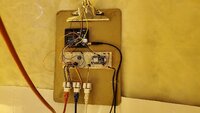
The brains. Arduino controlling stepper motors. Esp-8266-12e nodemcu to view the current states over wifi.

Some happy girls.

And this is how I monitor my room remotely in my house. The damper readouts tell me current position as a percentage from closed to open.
Under the lights, temps are a steady 24°C and 55% RH. The 600 watt hps doesn't put off enough heat to raise the temp to 25°C. Probably add a dehumidifier in the future. Plan to make proper boxes for the microcontrollers.
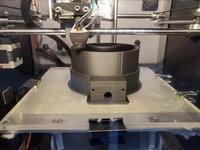
Here's a shot of the damper housing being printed.
Hope you enjoyed.
Basically two stepper motors controlling the dampers. One damper is store bought, made for recovering heat from dryer exhaust. I designed and printed gears to turn the damper with the motor. I designed and printed the other damper.

Modified damper. Controls exhaust rate.

This one directs recirculating air through a humidifer. Not attached in spring summer.

The brains. Arduino controlling stepper motors. Esp-8266-12e nodemcu to view the current states over wifi.

Some happy girls.

And this is how I monitor my room remotely in my house. The damper readouts tell me current position as a percentage from closed to open.
Under the lights, temps are a steady 24°C and 55% RH. The 600 watt hps doesn't put off enough heat to raise the temp to 25°C. Probably add a dehumidifier in the future. Plan to make proper boxes for the microcontrollers.

Here's a shot of the damper housing being printed.
Hope you enjoyed.


 Nice. I've been looking at getting a printer lately for these kinds of projects. I was looking at something from creality, relatively affordable, seem to be decent units. Any input would be much appreciated.